Blog Repero
Finding a Repair Shop System
19th OF JUNE, 2026
A good repair system is something that can certainly improve the efficiency of a repair shop. Different repair shops have different needs so it is important that you find a system that works for you.
With Repero you can use the system as you want to and customize to best fit your needs. Repero's customization is the reason why it is being used by all different types of repair shops, from piano repairs, to bicycles, to phones, to power tool repairs and everything in between.
When a repair shop starts to use a new software, it can be very helpful to first get to know the system and its capabilities and how they can be utilized within your organization. To find features and customization options it is best to look at Settings found in the top left in the system. There you can set your system language and currency and date format options, select which information you want to add to your invoices as well as the VAT percentage.
More importantly you can also set which fields within the system you want to be required. The system does not have required fields by default, but you can choose if you want some to be required and which ones.
You are also able to create and customize your statuses and so much more. If you have not already, create an account and try it out for yourself.
By Lena Dís Rúnarsdóttir
Create and Send Out Quotes
26th OF JANUARY, 2026
When a customer wants an item repaired, it is necessary for him to be able to get an estimation on how much a repair will cost. That is a factor that really affects the decision if an item is worth repairing. So it is an important feature for a repair shop software to include.
That is why we have added a new feature in Repero where you can create a quote and send it through the system to the approved by the customer. You can actually send out multiple quotes, giving your customer different options, and they can choose a quote and you will receive an answer, all through Repero. This is a time saving feature like no other, no back and forth emails or calls.
How the feature works is that you start by creating a quote for a repair, in the same way you create an invoice. Once the Quote has been created and all items added to the quote, it can then be sent to the customer from the notification tab. When your customer has approved a quote, you will receive a notification in the system and you will be able to see if he has approved and which option. So you will be able to start the work and by clicking the ‘Create Invoice’ button, an invoice will be created from the quote.
Check out this new feature and see if it can improve your workflow.
As always, you are always welcome to reach out to us with any questions or if you need help getting started with Quotes.

Need help?
If you have any issues or questions you can always send us an email to repero@repero.me or through our contact form.
Or you have an idea for a new feature or for improvements? We are always intrested in hearing your thoughts!
By Lena Dís Rúnarsdóttir
Improved Status Checker
16th OF AUGUST, 2025
Allowing your customers to look up the status of the repair is a great way to keep your customers informed without having to spend time either answering the phone or replying to emails to let them know what is going on with their repair. This is a very popular feature that has just received an upgrade that you have asked for. A request from our users was to be able to allow customers to access further information about the repair, so we have now just added the option to Repero, to share more information.
Now you can choose which information you want to share with your customers about their repair within the repair shop system. This will help them have a better understanding about the current condition of their product and where it is in the process. It is now possible to add the product serial number, description, solution, materials and price of the repair, in addition to the status.
You might want to keep some information private within the system and make sure you are not sharing a field that is not meant for your client. In settings, you can select which information you want your customers to be able to look up.
By Lena Dís Rúnarsdóttir
Checklists
28th OF JUNE, 2025
We have just launched a new feature that will help you complete your tasks with more oversight and visibility. When completing the same tasks for multiple repairs, it can be a good to have a visual representation so things are not missed. Enter the checklist, a simple but effective way to improve organization making sure that all tasks have been completed.

Checklists can be created on the fly or added from a previously created template. That means that if you have tasks that have to be completed for every repair or a certain type of repair, you can create templates that will enable you to quickly create a checklist inside a repair that already includes the tasks. You can add a due date and assign it to an employee.
You can create a new checklist template inside settings and create stand alone checklists inside a repair or as a single checklist without a connection to a repair. Go to settings here.
By Lena Rúnarsdóttir
Keep your customers up to date on their repair
9th OF OCTOBER, 2024
As much as your customers trust your repair shop to handle their property it might be a good idea to keep them up to date and inform them about the status of the repair and stay in front of the questions.
Keeping them informed through your repair shop software is the easiest way to do that and with Repero you have several ways to make sure your customers are in the loop, you can send text messages, emails or allow them to check the status through the status checker.

TEXT MESSAGES
If you want to keep customers informed by text messages, you can create a few templates that can cover your most common situations that you would want to update customers on. It could be that you have started the repair, you are waiting for parts or that the repair has been completed and so on. In your template you can add variables that will add the customers name, price and repair id.
Depending on countries restrictions, text messages can be sent from your phone number, name or a Repero number. Today text messages are heavily restricted in many countries due to the increasing influx of spam in the last years so most countries have set up limitations that can differ from country to country. You might need to register your phone number or name to improve your deliverability and adjust your content to fit the restrictions. Please contact us if you have questions about this.
EMAILS
You can also send your customers emails and create templates for them as well. As emails can be longer it gives you a lot more freedom with their content and you can attach the receipt or invoice to email templates. To emails you can add a lot of variables, like price, status, product and so on. Depending on your subscription you can send emails from your own email address.
STATUS CHECKER
Customers can also follow the status of their repair through the Status checker. That way you can save a lot of time in not having to update them and answer phone calls or messages. The status checker can be used with a repair number and an email or phone number. You can add the status checker to your website or use the one on your Repero page.
So with Repero you have several options and you can use the method that you think works the best for your customers or combine them depending on the information you want to share. You can allow your customers to check their status while also sending them emails and text messages with important updates. If you have any questions you can always contact us and we will help you figure out what works best for you.
By Lena Rúnarsdóttir
Allow your customers to send in Repair Requests
4th OF MARCH, 2024
We have just launched a new feature called Repair requests. This feature will enable your customers to send in requests through Repero and enable you to accept them within the system. This will help you enter data faster and make it easier for you to accept requests.
The Repair requests are done in a form that you can either embed on your website or direct your customers to your Repero website. In the form, customers can enter their information in their own time. The repair requests will appear in the Repair request tab where you can get an overview of all requests. From there, you can accept the requests and match them with an existing client and a product or create a new client if no matches are found.

Your customers can send the request from their own home before coming to the store and save you both time and help you coordinate your time better.
The repair request form is a standard form but you can add your customized questions and answer option and choose which fields are required to be filled out. For example, you can add the different types of repairs you offer and the customer can choose what he thinks he needs.
Once a customer has submitted a request you can set the system so an automatic email is sent to the customer to confirm the submission and include in that email the information you think is good for the customer to be aware of.
This feature could also enable you to allow your customers to fill in their information themselves in the store, to save you from typing it in yourself. The customer can navigate to the form on their own device or if you have a tablet or a computer the customer can fill in their information there.
To start accepting repair requests through the system, the first thing you have to do is to turn on Repair requests in your settings and make the form accessible, see Repair Requests here.
By Lena Rúnarsdóttir
Customise Repero to suit your needs
15th OF JANUARY, 2024
Repero’s goal is always to provide a simple but effective software that is built for our users. That is why we have customisations inside the system to fit your needs.
We have several fields that you can change the names of and add extra fields if you need to add further information for both products and repairs.
You can find more about the custom fields here.
Another highly customisable feature are the repair tags and product tags. Using repair tags is an excellent way to improve your workflow and keep relevant information ready at a glance. You can use it for anything you can think of, for example to group together a certain type of repair, like urgent or warranty, quick description of suspected issue, like Battery issue or shelf number of where the product is.

You are of course able to customise your invoices and add your logo and choose the information you want to have on your invoices.
Finally something that will quickly improve and speed up communications with your customers is the custom emails and text messages. You can create your own customised templates and send out emails and text messages with relevant information to every repair with only one click. Saving you time from having to spend valuable time on the phone or writing down information for an email or text messages.
You are now also able to send emails from Repero from your own email address. This will allow your customers to immediately recognize the email address and context.

By Lena Rúnarsdóttir
Schedule Email Reminders
15th OF AUGUST, 2023
We have just launched a new highly requested feature, now you can create reminders for future appointments, follow-up or maintenance.
This feature will allow you to schedule a maintenance or follow-up for a future date when finishing the repair.
For example when you have finished a repair and you can see that the item will benefit from a follow-up in 6 months, you can schedule it inside the repair.
To schedule a reminder you do it from inside the repair. You first find the Reminders button and from there you can create a new reminder. Clicking the Reminders button will open a window where you can select the time you want to schedule the reminder to be sent at. There you can also enter the text and title you want to send to your customer.
We recommend creating a Custom Email that you can use as a template for the reminders you want to send out, but you can also write a reminder every time you want to create one or modify it with customised details specific to this product or customer.
Once you have filled out everything like you want to have it, you can click save. You have now scheduled a reminder to be sent at your chosen time. The reminder will be sent and your client can follow up with you when they will receive the reminder.

By Lena Dís Rúnarsdóttir
Coming to Repero from another system
3rd OF MAY, 2023
If you are coming to Repero from another Repair management system like Repairshopr or similar, we have made it easy for you to get started right away using Repero.
You are able to upload all your Repairs or tickets and your clients and their products as well as your inventory, so getting started in Repero will take no time at all. We have made it easy for you to keep all your records so you can move over to Repero with minimal disturbance to your process.
To start with, we recommend inviting your employees to the system, that way you can have employees assigned to repairs and you can keep all your records. Just make sure the employee names in Repero match the employee name in your file.
Secondly, to keep your customers connected to their repairs, you need to start with uploading your client file and make sure your external_id will match the external_client_id in the repair file.
The most important part of uploading all the files is making sure that the first line of your CSV file matches with the information you are going to upload. So your first line should only include the details you want to upload and match the position of the actual data.
Another important thing is to choose the correct delimiters when exporting the file.
- Field delimiter: , (comma)
- String delimiter: " (double quotes)
For example, if I am going to upload the client list I have, and I only have name, email and telephone number. The first line of my CSV would look like this: name,email,tel1. So my document would look like this:
- name,email,tel1
- John Smith, test@example.com, 5551234
- Rose Jones, rosiejones@example.com, 5556789
- Jonas, jonas@jonas.com, 5554321
Best Practises - Quick Guide
Delimiters for file export:
Field delimiter: , (comma)
String delimiter: " (double quotes)
Before you upload:
- Make sure the header of your CSV’s are correct
- Invite employees to Repero
- Match employee name in the file to the invited names in Repero, can be an email
- Match external_id in client file matches external_client_id in the repair file
Upload files in the correct order:
- Start with Clients file
- Then upload the repair/tickets file
Click here to upload and let us know if you have any issues!
By Lena Dís Rúnarsdóttir
Inventory Groups
9th OF FEBRUARY, 2023
We have now added Inventory groups to our repair management system. The groups will enable you to add materials for frequent tasks much quicker.
In inventory you just have to click the arrow on the right of the ‘Add to inventory’ button and select the Inventory groups. From the Inventory Groups page you can ‘Create inventory groups’, just select a name for your group and if you want you can add a description and SKU number.
Then all you have to do is to add the inventory items to the group. Once you have selected the materials, you can adjust the quantity.
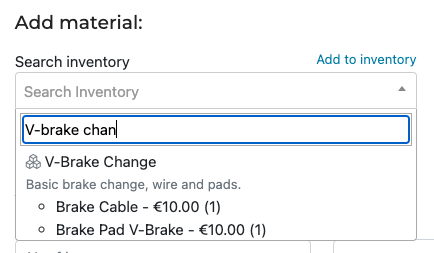
After a group has been created, you can find it inside repairs. Just search for the name in the inventory dropdown. When a group is selected all the materials from the group are added to the repair. So you save time by not having to search individually for each item.
Inventory groups are only available for Business, Premium and Ultimate subscriptions plans.
Check out inventory groups here and let us know your thoughts!
By Lena Dís Rúnarsdóttir
Send Invoice with Email to Clients
23rd OF NOVEMBER, 2022
We have just made a great addition to our repair management system, you are now able to send invoices through email with Repero.
It is very simple, you just have to create an email template and then you just have to click one button every time you want to send the Invoice.
The template is created in Custom emails in your settings, you write the email you want to send to your customers, using the variables available and then finish by checking the Attach invoice box.
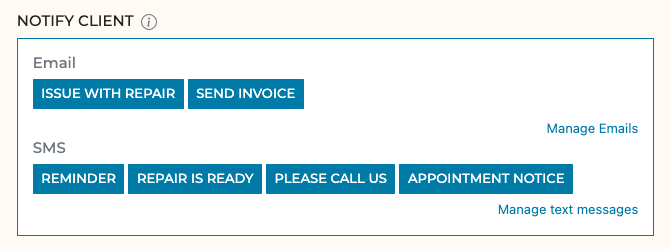
This will then become available inside repairs in the Notify Client box.
Custom Emails are only available for Business, Premium and Ultimate subscriptions plans.
Need help?
If you have any issues or questions you can always send us an email to repero@repero.me or through our contact form.
Or you have an idea for a new feature or for improvements? We are always intrested in hearing your thoughts!
By Lena Dís Rúnarsdóttir
Repair status lookup for customers
21th OF NOVEMBER, 2022

We have now created a portal that allows your customers to look up the status of their repair. The only thing the customer needs to look up the status is their repair number and either their phone number or email.
To enable this feature you need to check the Publish box and the Allow status lookup in the settings.
There you can also see the path to your shops page which has the status lookup portal and how to embed the status lookup iframe to your own website.
You can send clients their repair numbers through the custom emails or custom text messages and of course send them the link to your shops page.
Need help?
If you have any issues or questions you can always send us an email to repero@repero.me or through our contact form.
Or you have an idea for a new feature or for improvements? We are always intrested in hearing your thoughts!
By Lena Dís Rúnarsdóttir
Customised text messages
10th OF MAY, 2022

We have just added a new feature that many of you have been waiting for!
You are now able to create custom text messages to send to your clients. This allows you to provide your clients with any information you want, for example information about the status of the repair, cost or whatever you fancy.
The way this works is that you create a template for the message you want to send in ‘Text messages’ in settings. First you create a title for the text message, this title will not be sent to the client but it will be the title that appears in the repair for your employees to differentiate this text message from others you might create. Next you need the content for the template. In the content of the message you can add variables that will add the information that are specific to each repair, right now the variables that are available are, name of the client, current price of the repair and repair number. If you want to be able to add more information, just let us know and we will add it.
If you create multiple text messages, you can change the order they appear in, by arranging them in the table and dragging them to the position you want.
You can find this feature in the Text Messages tab in your settings or just click here to manage your text messages.
If you run into any issues or questions don’t hesitate to contact us!
By Lena Dís Rúnarsdóttir
Bulk upload inventory
9th OF MAY, 2022

Work efficiently by uploading your inventory items in bulk. To do so items must be uploaded in an CSV file that follows the specific format. The upload format is strict, so we recommend reading the instructions closely and try the feature first with a small batch of products. If you run into any issues don’t hesitate to get in touch and we will guide you through it.
You can access the bulk upload feature at the bottom right of your inventory table or click here to upload inventory.
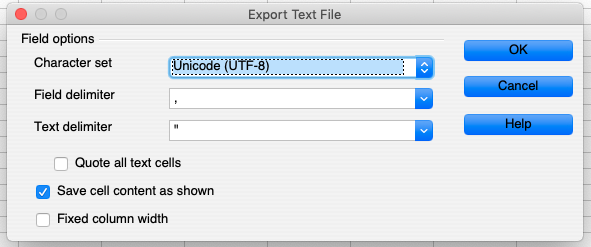
When you export your CSV from your spreadsheet program it is important to select that the file is UTF-8 encoded. Equally important is that the field delimiter is a , (comma) and the string delimiter is " (double quotes).
If you run into any issues or questions don’t hesitate to contact us!
By Lena Dís Rúnarsdóttir
Using a barcode scanner with Repero
16th OF MARCH, 2022
You can use a barcode scanner to scan your products when you put them into your inventory.
You can then search for a product, inside a repair, using the barcode scanner.
You might need to change the scanner settings, so it does not add the ENTER symbol after each scan.
This way, the scanner will only transform the barcode to text, and not press ENTER afterwards.
Some scanners do this by default.
This example is using this scanner.

If we would scan the second (lower) barcode, the scanner would stop adding the ENTER key.
If we would scan the first (upper) barcode, the scanner would start adding the Enter key again.
By Viktor Smári
Use Repero Webhooks
8th OF FEBRUARY, 2022

We have now started to add webhooks to Repero. By using webhooks you can connect Repero to, for example, Shopify or another POS system you are using.
To begin with we have added one webhook. This webhook sends client information to whichever point you like. This can save time from having to enter your client information twice or having to copy/paste information between systems.
The webhook works with Zapier, where you can set up how the content is forwarded to Shopify.
Find the Webhook settings in the menu bar in settings.
We are planning to add more webhooks to Repero, what kind of webhook should we add next?
Need help?
If you need any help setting up, you can always contact us on twitter or through our contact form.
Or you have an idea for a new feature or for improvements? We are always intrested in hearing your thoughts!
By Lena Dís Rúnarsdóttir
Start using Repair Tags
20th OF OCTOBER, 2021
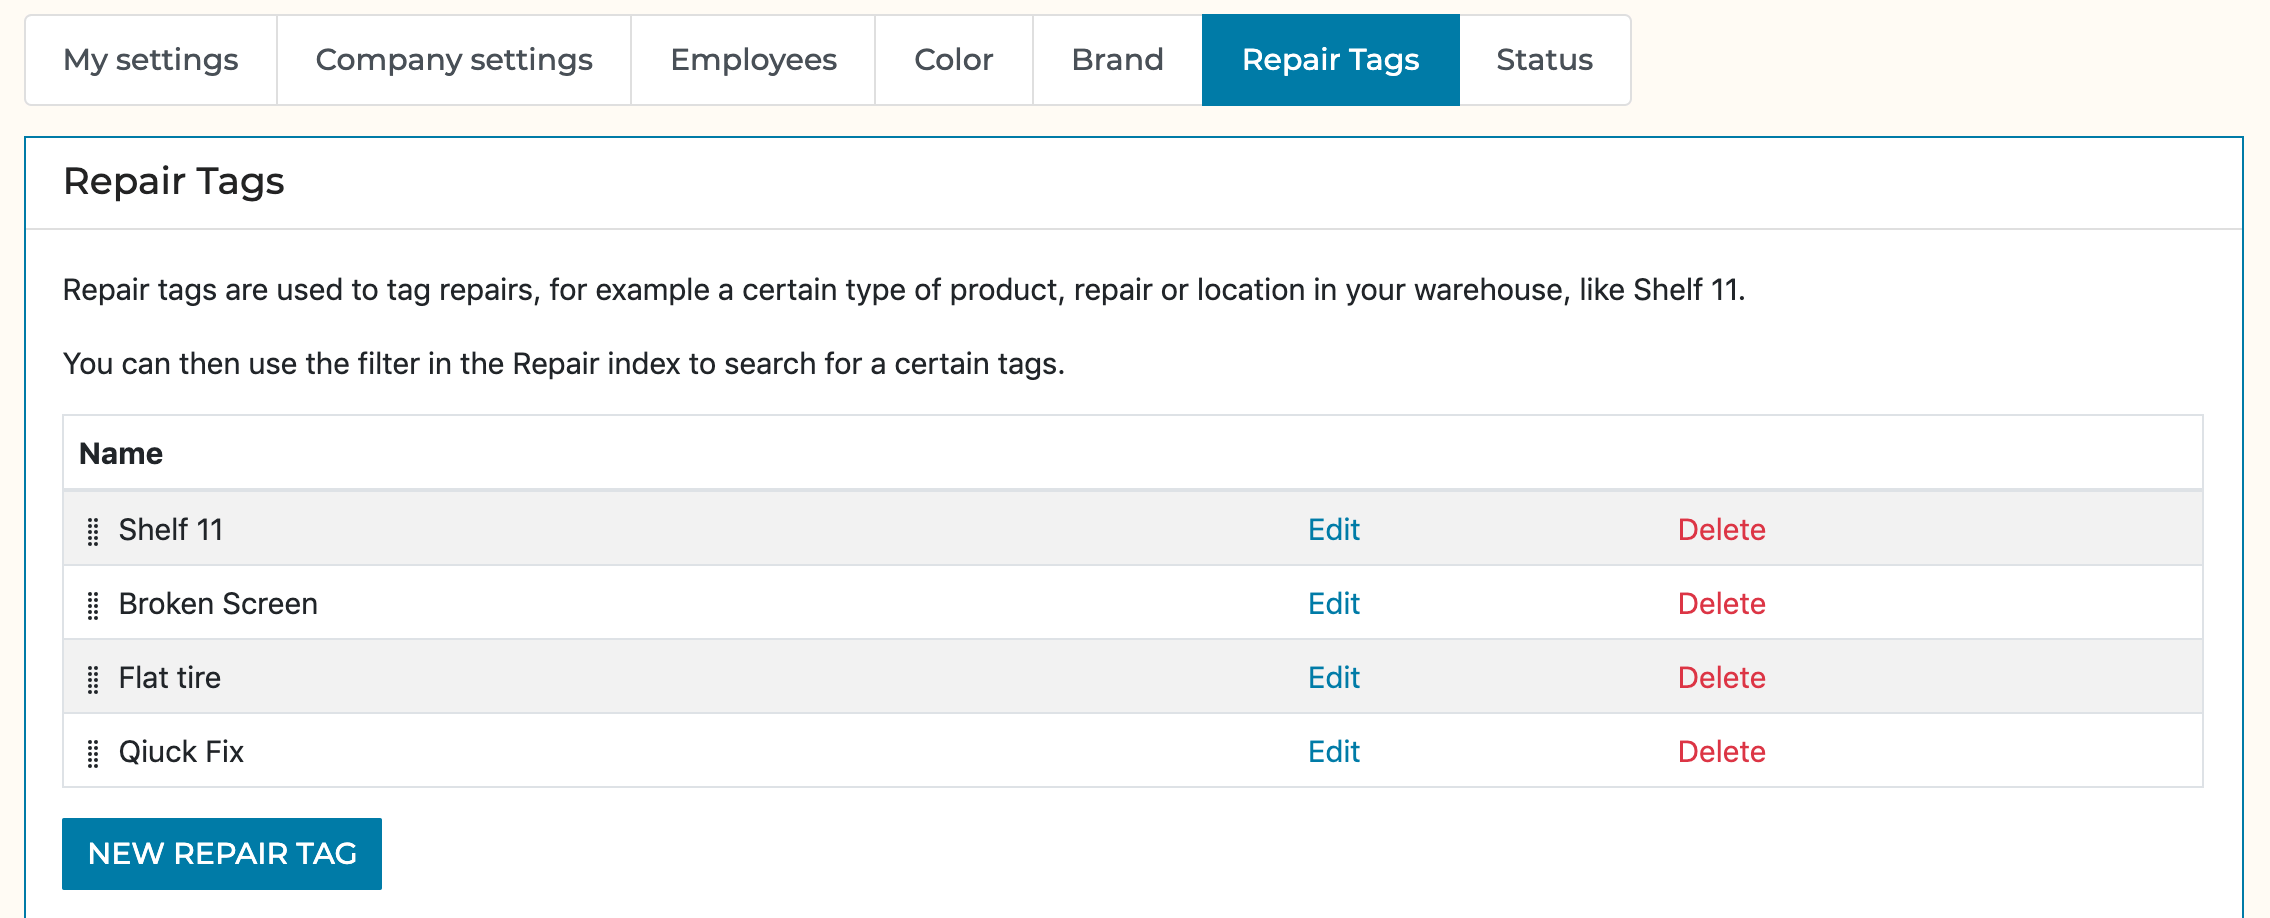
A recent addition to Repero are the repair tags. Our aim is to create a system that can be adapted to every company and the repair tags are a great example of that. They are applied to a repair and are very versatile and can be used for whatever suits your business and repair shop. For example, they can be used to mark an item's location in your shop, like ‘Shelf 11’ or the specific type of repair like ‘Broken Screen’ or ‘Flat Tire’ or whatever else comes to mind!
To start using the repair tags, you have to create the tags in settings. Once the tag is created, you can start using them in your repairs. Each repair can be tagged with as many tags as you want, you can then use these tags to filter the repairs in the Repair index page.
We would love to do more with the repair tags in the future so if you think of something, let us know and we will make it happen!
Need help?
If you have any issues or questions you can always contact us on twitter or through our contact form here.
Or you have an idea for a new feature or for improvements? We are always intrested in hearing your thoughts!
By Lena Dís Rúnarsdóttir
Upload clients with CSV or Excel
14th OF OCTOBER, 2021

If you are coming to Repero from another system or even a spreadsheet, we have an option to upload your clients to get you started with in Repero. Using a CSV file you are able to upload your clients, but a CSV document is a simple file that can be exported from, for example Excel or Google Spreadsheet.
At the bottom of your client index you can access the page where this is possible or click here to upload clients. On the page are detailed instructions on how to make your CSV document and it is very important to follow the instructions, because the CSV file has to be correct so the data loads correctly to our system.
You don’t have to enter all the details we have available, but it is important that the first line of your CSV file matches with the information you are going to upload. So your first line should only include the details you want to upload and match the position of the actual data. Another important thing is to choose the correct delimiters when exporting the file.
String delimiter: " (double quotes)
For example, if I am going to upload the client list I have, and I only have name, email and telephone number. The first line of my CSV would look like this: name,email,tel1.
So my document would look like this:
John Smith, test@example.com, 5551234
Rose Jones, rosiejones@example.com, 5556789
Jonas, jonas@jonas.com, 5554321
We recommend trying it out with just a few clients and make sure all the information is correctly uploaded to the correct place.
Need help?
If you have any issues or questions you can always contact us on twitter or through our contact form.
Or you have an idea for a new feature or for improvements? We are always intrested in hearing your thoughts!
By Lena Dís Rúnarsdóttir
Time Tracker and customize invoices
4th OF JUNE, 2021
Time Tracker
Our newest feature is the Time Tracker, this was something that has been requested several times and we felt would be a great fit for Repero and we hope you do too!
The time tracker is a tool to help you better figure out how much time you spend on each task. You find the time tracker inside every repair and when you start working on the task, you start the timer and the timer keeps tracking even if you close the window. Once you have finished or take a break from working on the task, you stop the timer. The tracker will add together all tracked periods and give you the total time spent on a task. Don’t worry if you make a mistake, you can always edit the period you tracked!

Images And Custom Text For Invoices
Another highly requested feature that we have recently added, is that you are now able to add logos and custom text to your invoices. In your Company settings you can find a section called Invoice information and from there you can add a custom text and an image to your invoices.
Arrange Statuses
Now you can arrange the statuses for repairs so you can control the order they appear in inside the dropdown. You can choose which ones are first on the list when selecting a status for a repair. You can find the settings for statuses in Status settings. There you can start arranging the statuses by using a drag and drop functionality.
Any ideas?
Do you have an idea for a new feature or for improvements?
Contact us through our Contact form.
By Lena Dís Rúnarsdóttir
More like this:
- Finding a Repair Shop System
- Create and Send Out Quotes
- Improved Status Checker
- Checklists
- Keep your customers up to date on their repair
- Allow your customers to send in Repair Requests
- Customise Repero to suit your needs
- Email Reminders
- Coming from another system
- Inventory Groups
- Send Invoice with Email
- Create and Send Out Quotes
- Repair status lookup for customers
- Customized text messages with Repero
- How to use a Barcode Scanner with Repero
- Upload clients with CSV or Excel
- Upload inventory with CSV or Excel
- How to use Repair tags with Repero
- How to use Webhooks in Repero
- Time Tracker and custom invoices in Repero
- Migrating from RepairShopr to Repero